Kontynuacja serii o doskonaleniu umiejętności posługiwania się Linuxem.
11
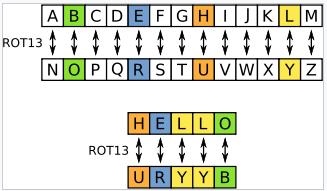
Level Goal

The password for the next level is stored in the file data.txt, where all lowercase (a-z) and uppercase (A-Z) letters have been rotated by 13 positions

Commands you may need to solve this level

grep, sort, uniq, strings, base64, tr, tar, gzip, bzip2, xxd
Zaglądam do pliku tesktowego:
bandit11@bandit:~$ cat data.txt
Gur cnffjbeq vf 5Gr8L4qetPEsPk8htqjhRK8XSP6x2RHh
Tym razem wszystkie litery zostały przesunięte o 13 pozycji. Aby uzyskać hasło do następnego poziomu użyłem polecenia tr, które zmienia znaki ze standardowego strumienia wejścia (stdin). W przykładzie użyto szyfru ROT-13:
Rozwiązanie:
bandit11@bandit:~$ cat data.txt | tr '[a-z][A-Z]' '[n-za-m][N-ZA-M]'
The password is 5Te8Y4drgCRfCx8ugdwuEX8KFC6k2EUu
12
Level Goal

The password for the next level is stored in the file data.txt, which is a hexdump of a file that has been repeatedly compressed. For this level it may be useful to create a directory under /tmp in which you can work using mkdir. For example: mkdir /tmp/myname123. Then copy the datafile using cp, and rename it using mv (read the manpages!)

Commands you may need to solve this level

grep, sort, uniq, strings, base64, tr, tar, gzip, bzip2, xxd, mkdir, cp, mv, file
Jest to poziom, w którym przećwiczymy umiejętność rozpakowywania skompresowanych plików.
Na początku tworzę folder w katalogu /tmp oraz kopiujemy do niego plik na którym będę przeprowadzał dalsze operacje:
bandit12@bandit:~$ mkdir /tmp/cyb3r_olszi && cp data.txt /tmp/cyb3r_olszi
W zadaniu mamy informację że jest to hexdump pliku, który wcześniej był wielokrotnie kompresowany.
Wykorzystałem narzędzie xxd, żeby wykonać odwrotoność zrzutu hex:
bandit12@bandit:/tmp/cyb3r_olszi$ xxd -r data.txt > data
bandit12@bandit:/tmp/cyb3r_olszi$ file data
data: gzip compressed data, was "data2.bin", last modified: Thu May 7 18:14:30 2020, max compression, from Unix
Następnie zabrałem się za żmudną i wielokrotną dekompresję pliku:
bandit12@bandit:/tmp/cyb3r_olszi$ mv data data.gz
bandit12@bandit:/tmp/cyb3r_olszi$ gzip -d data.gz
bandit12@bandit:/tmp/cyb3r_olszi$ ls
data data.txt

bandit12@bandit:/tmp/cyb3r_olszi$ file data
data: bzip2 compressed data, block size = 900k
bandit12@bandit:/tmp/cyb3r_olszi$ mv data data.bz
bandit12@bandit:/tmp/cyb3r_olszi$ bzip2 -d data.bz
bandit12@bandit:/tmp/cyb3r_olszi$ ls
data data.txt

bandit12@bandit:/tmp/cyb3r_olszi$ file data
data: gzip compressed data, was "data4.bin", last modified: Thu May 7 18:14:30 2020, max compression, from Unix
bandit12@bandit:/tmp/cyb3r_olszi$ mv data data.gz
bandit12@bandit:/tmp/cyb3r_olszi$ gzip -d data.gz

bandit12@bandit:/tmp/cyb3r_olszi$ file data
data: POSIX tar archive (GNU)
bandit12@bandit:/tmp/cyb3r_olszi$ mv data data.tar
bandit12@bandit:/tmp/cyb3r_olszi$ tar -xvf data.tar
data5.bin

bandit12@bandit:/tmp/cyb3r_olszi$ file data5.bin
data5.bin: POSIX tar archive (GNU)
bandit12@bandit:/tmp/cyb3r_olszi$ ls
data5.bin data.tar data.txt
bandit12@bandit:/tmp/cyb3r_olszi$ tar -xvf data5.bin
data6.bin

bandit12@bandit:/tmp/cyb3r_olszi$ file data6.bin
data6.bin: bzip2 compressed data, block size = 900k
bandit12@bandit:/tmp/cyb3r_olszi$ bzip2 -d data6.bin
bzip2: Can't guess original name for data6.bin -- using data6.bin.out

bandit12@bandit:/tmp/cyb3r_olszi$ file data6.bin.out
data6.bin.out: POSIX tar archive (GNU)
bandit12@bandit:/tmp/cyb3r_olszi$ tar -xvf data6.bin.out
data8.bin

bandit12@bandit:/tmp/cyb3r_olszi$ file data8.bin
data8.bin: gzip compressed data, was "data9.bin", last modified: Thu May 7 18:14:30 2020, max compression, from Unix
bandit12@bandit:/tmp/cyb3r_olszi$ mv data8.bin data8.gz
bandit12@bandit:/tmp/cyb3r_olszi$ gzip -d data8.gz
bandit12@bandit:/tmp/cyb3r_olszi$ ls
data5.bin data6.bin.out data8 data.tar data.txt

bandit12@bandit:/tmp/cyb3r_olszi$ file data8
data8: ASCII text
bandit12@bandit:/tmp/cyb3r_olszi$ cat data8
The password is 8ZjyCRiBWFYkneahHwxCv3wb2a1ORpYL
13
Level Goal

The password for the next level is stored in /etc/bandit_pass/bandit14 and can only be read by user bandit14. For this level, you don’t get the next password, but you get a private SSH key that can be used to log into the next level. Note: localhost is a hostname that refers to the machine you are working on

Commands you may need to solve this level

ssh, telnet, nc, openssl, s_client, nmap
Rozwiązanie:
bandit13@bandit:~$ ls
sshkey.private
bandit13@bandit:~$ ssh bandit14@localhost -i sshkey.private
bandit14@bandit:~$ cat /etc/bandit_pass/bandit14
4wcYUJFw0k0XLShlDzztnTBHiqxU3b3e
Zalogowałem się na kolejnego użytkownika przez ssh, wykorzystując jego klucz prywatny. W katalogu /etc/bandit_pass/bandit14 odczytałem hasło.
14
Level Goal

The password for the next level can be retrieved by submitting the password of the current level to port 30000 on localhost.

Commands you may need to solve this level

ssh, telnet, nc, openssl, s_client, nmap
Rozwiązanie:
bandit14@bandit:~$ echo 4wcYUJFw0k0XLShlDzztnTBHiqxU3b3e | nc localhost 30000
Correct!
BfMYroe26WYalil77FoDi9qh59eK5xNr
Przekazałem hasło wykorzystując potok (tzw. pipe). Do połączenia z portem użyłem narzędzia netcat. W zamian dostałem hasło do następnego poziomu.
15
Level Goal

The password for the next level can be retrieved by submitting the password of the current level to port 30001 on localhost using SSL encryption.
Helpful note: Getting “HEARTBEATING” and “Read R BLOCK”? Use -ign_eof and read the “CONNECTED COMMANDS” section in the manpage. Next to ‘R’ and ‘Q’, the ‘B’ command also works in this version of that command…

Commands you may need to solve this level

ssh, telnet, nc, openssl, s_client, nmap
Zadanie bardzo podobne do poprzedniego, z tą różnicą, że należy nawiązać połącznenie szyfrowane SSL. Netcat nie obsługuje SSLa, więc w tym przykładzie skorzystałem z narzędzia openssl:
bandit15@bandit:~$ echo BfMYroe26WYalil77FoDi9qh59eK5xNr | openssl s_client -connect localhost:30001 -quiet
depth=0 CN = localhost
verify error:num=18:self signed certificate
verify return:1
depth=0 CN = localhost
verify return:1
Correct!
cluFn7wTiGryunymYOu4RcffSxQluehd
Podobnie jak wcześniej do przekazania hasła wykorzystałem potok. Do nawiązania połączenia użyłem openssl z opcją quiet, aby wyświetlić bardziej klarowny wynik.
16
Level Goal

The credentials for the next level can be retrieved by submitting the password of the current level to a port on localhost in the range 31000 to 32000. First find out which of these ports have a server listening on them. Then find out which of those speak SSL and which don’t. There is only 1 server that will give the next credentials, the others will simply send back to you whatever you send to it.

Commands you may need to solve this level

ssh, telnet, nc, openssl, s_client, nmap
Zadaniem jest po pierwsze wykrycie otwartych portów w przedziale 31000-32000, a nastepnie ustalenie z którymi z nich można nawiązać połączenie SSL.
Aby to wykonać użyłem skanera portów nmap. Jest to kluczowe narzędzie wykorzystywane przez każdego pentestra w fazie tzw. „rekonesansu”:
bandit16@bandit:~$ nmap -p 31000-32000 -sV localhost
Starting Nmap 7.40 ( https://nmap.org ) at 2020-09-01 11:50 CEST
Nmap scan report for localhost (127.0.0.1)
Host is up (0.00023s latency).
Not shown: 996 closed ports
PORT STATE SERVICE VERSION
31046/tcp open echo
31518/tcp open ssl/echo
31691/tcp open echo
31790/tcp open ssl/unknown
31960/tcp open echo
Przełączniki, które użyłem przy skanowaniu:
- p – zdefiniowanie zakresu skanowanych portów
- sV – wykrycie usług/wersji na otwartych portach
Dzięki nmap’owi znalazłem otwarte porty oraz ustaliłem sposób w który będę się z nimi łączył. Sprawdzamy kolejno który z nich zwróci hasło do następnego poziomu:
bandit16@bandit:~$ echo cluFn7wTiGryunymYOu4RcffSxQluehd | nc localhost 31046
cluFn7wTiGryunymYOu4RcffSxQluehd
^C
bandit16@bandit:~$ echo cluFn7wTiGryunymYOu4RcffSxQluehd | openssl s_client -connect localhost:31518 -quiet
depth=0 CN = localhost
verify error:num=18:self signed certificate
verify return:1
depth=0 CN = localhost
verify return:1
cluFn7wTiGryunymYOu4RcffSxQluehd
^C
bandit16@bandit:~$ echo cluFn7wTiGryunymYOu4RcffSxQluehd | openssl s_client -connect localhost:31790 -quiet
depth=0 CN = localhost
verify error:num=18:self signed certificate
verify return:1
depth=0 CN = localhost
verify return:1
Correct!
-----BEGIN RSA PRIVATE KEY-----
MIIEogIBAAKCAQEAvmOkuifmMg6HL2YPIOjon6iWfbp7c3jx34YkYWqUH57SUdyJ
imZzeyGC0gtZPGujUSxiJSWI/oTqexh+cAMTSMlOJf7+BrJObArnxd9Y7YT2bR
......
dxviW8+TFVEBl1O4f7HVm6EpTscdDxU+bCXWkfjuRb7Dy9GOtt9JPsX8MBTakzh3
vBgsyi/sN3RqRBcGU40fOoZyfAMT8s1m/uYv52O6IgeuZ/ujbjY=
-----END RSA PRIVATE KEY-----
W wyniku dostałem klucz prywatny (umyślnie go uciąłem z jasnych powodów), który wykorzystam przy połączeniu do następnego poziomu.
17
Level Goal

There are 2 files in the homedirectory: passwords.old and passwords.new. The password for the next level is in passwords.new and is the only line that has been changed between passwords.old and passwords.new
NOTE: if you have solved this level and see ‘Byebye!’ when trying to log into bandit18, this is related to the next level, bandit19

Commands you may need to solve this level

cat, grep, ls, diff
Na początku zapisałem poprzedni klucz prywatny do pliku. Następnie nadałem mu odpowiednie uprawnienia (tylko do odczytu):
$ chmod 400 bandit17.key
$ ssh bandit17@bandit.labs.overthewire.org -p 2220 -i bandit17.key
Przeszedłem do analizy plików wspomnianych w zadaniu:
bandit17@bandit:~$ diff passwords.new passwords.old
42c42
< kfBf3eYk5BPBRzwjqutbbfE887SVc5Yd
---
> w0Yfolrc5bwjS4qw5mq1nnQi6mF03bii
Narzędzie diff porównało pliki i pokazało linie które zostały zmienione. Jedna z tych linii to hasło do nastepnego poziomu.
18
Level Goal

The password for the next level is stored in a file readme in the homedirectory. Unfortunately, someone has modified .bashrc to log you out when you log in with SSH.

Commands you may need to solve this level

ssh, ls, cat
W tym poziome od razu po zalogowaniu połączenie z hostem zostaje zakończone. Jednakże w zadaniu dostajemy info, że hasło znajduje się w pliku readme w katalogu użytkownika.
Rozwiązanie:
$ ssh bandit18@bandit.labs.overthewire.org -p 2220 -t "cat ~/readme"
This is a OverTheWire game server. More information on http://www.overthewire.org/wargames
bandit18@bandit.labs.overthewire.org's password:
IueksS7Ubh8G3DCwVzrTd8rAVOwq3M5x
Connection to bandit.labs.overthewire.org closed.
Do rozwiązania zadania, użyłem przełącznika -t, dzięki któremu otczytaliśmy na maszynie zawartość pliku readme.
19
Level Goal

To gain access to the next level, you should use the setuid binary in the homedirectory. Execute it without arguments to find out how to use it. The password for this level can be found in the usual place (/etc/bandit_pass), after you have used the setuid binary.
Rozwiązanie:
bandit19@bandit:~$ ls -l
total 8
-rwsr-x--- 1 bandit20 bandit19 7296 May 7 20:14 bandit20-do
bandit19@bandit:~$ ./bandit20-do
Run a command as another user.
Example: ./bandit20-do id
bandit19@bandit:~$ ./bandit20-do id
uid=11019(bandit19) gid=11019(bandit19) euid=11020(bandit20) groups=11019(bandit19)
bandit19@bandit:~$ ./bandit20-do cat /etc/bandit_pass/bandit20
GbKksEFF4yrVs6il55v6gwY5aVje5f0j
bandit20-do to plik binarny, który miał ustawione uprawnienia specjalne (bit setuid). W powyższym przykładzie plik wykonywalny, mógł być wykonany przez zwykłych użytkowników z takimi uprawnieniami jakie posiada właściciel pliku, czyli bandit20. „Binarka” dała mi możliwość użycia polecenia cat na pliku należącym do użytkownika bandit20. Wykorzystałem to i odczytałem hasło do następnego poziomu zapisane w katalogu: /etc/bandit_pass/bandit20.
20
Level Goal

There is a setuid binary in the homedirectory that does the following: it makes a connection to localhost on the port you specify as a commandline argument. It then reads a line of text from the connection and compares it to the password in the previous level (bandit20). If the password is correct, it will transmit the password for the next level (bandit21).
NOTE: Try connecting to your own network daemon to see if it works as you think

Commands you may need to solve this level

ssh, nc, cat, bash, screen, tmux, Unix ‘job control’ (bg, fg, jobs, &, CTRL-Z, …)
Podobnie jak w poprzednim przykładzie mamy do czynienia z plikiem wykonywalnym, który ma ustawiony bit SETUID:
bandit20@bandit:~$ ls -l
total 12
-rwsr-x--- 1 bandit21 bandit20 12088 May 7 20:14 suconnect
bandit20@bandit:~$ ./suconnect
Usage: ./suconnect
This program will connect to the given port on localhost using TCP. If it receives the correct password from the other side, the next password is transmitted back.
Przy wykonaniu pliku dostałem informację zwrotną, że program:
- Nawiązuje połączenie z wybranym portem na localhost
- W przypadku kiedy dostanie właściwe hasło na wejście, wyrzuci hasło do następnego poziomu
Rozwiązanie:
bandit20@bandit:~$ echo GbKksEFF4yrVs6il55v6gwY5aVje5f0j | nc -l -p 4444 &
[1] 26919
bandit20@bandit:~$ ps aux | grep 4444
bandit20 26919 0.0 0.0 6300 1672 pts/40 S 13:40 0:00 nc -l -p 4444
bandit20 26952 0.0 0.0 12780 980 pts/40 S+ 13:40 0:00 grep 4444
bandit20@bandit:~$ ./suconnect 4444
Read: GbKksEFF4yrVs6il55v6gwY5aVje5f0j
Password matches, sending next password
gE269g2h3mw3pwgrj0Ha9Uoqen1c9DGr
[1]+ Done echo GbKksEFF4yrVs6il55v6gwY5aVje5f0j | nc -l -p 4444
Tak jak w poprzednich przykładach, przekazujemy hasło z tego poziomu i używamy narzędzia netcat. W tym przypadku jednak ustawiamy nc, tak aby nasłuchiwało na konkretnym porcie i ustawiamy komendę tak by działała w tle ( operator &). Następnie sprawdziłem, czy proces jest aktywny. Na samym końcu użyłem pliku wykonywalnego do nawiązania połączenia. W wyniku otrzymałem hasło do następnego poziomu 🙂


